I get asked all the time how do I make French macarons and is it doable. If you’ve ever checked out some of the tutorials online, you might have given up, they seem waaaaaaaay too complicated! But don’t worry, macarons don’t have to be. I’m done the research and put in the time experimenting, and I’ve come up with The Lazy’s Girls Guide to French Macarons: Shortcuts that make making this impossible cookie, possible.
I hope you enjoy my first cooking video: The Lazy’s Girls Guide to French Macarons
Lazy Girl’s Guide to French Macarons
Ingredients:
– 210 g of powdered sugar (Don’t have a kitchen scale? See below)
– 125 grams of almond meal
– 30 g of sugar
– 3 egg whites
– gel food coloring
Directions:
1. The first thing you’ll need to do is prepare your baking surface. Some people use silicone mats with templates (and honestly, that’s my favorite way of baking macarons) but if you don’t have a macaron mat, you can use a cookie sheet covered in parchment. You’ll want to place a template under the parchment so that the cookies are uniform. If you do this, though, don’t forget to slip the paper templates out from under the parchment before baking.
2. Now it’s time to measure out the dry ingredients. You’ll need 210 grams of powdered sugar. Yes, it’s a pain to use a scale if you’re not used to it, but trust me, this step is critical. Then, measure out 125 g of almond meal (sometimes called almond flour.)
3. Dump both the powdered sugar and the almond meal into a food processor and blend for a couple of minutes. This helps to ensure that the mixture is smooth and doesn’t have any obvious clumps.4. Set the almond meal/sugar mixture aside and it’s time to whip the egg whites. Here’s another shortcut for you. You can just dump in the egg whites, sugar and the food color all at once. Most tutorials have you add the egg whites till foamy, then add in the sugar and mix and then add in the food color. This is totally unnecessary……your welcome! Also, a lot of tutorials say you need to have your egg whites at room temperature….not so. Take those bad boys straight from the fridge. One thing to note on the food coloring, is that you definitely want to use gel food coloring. I’m using one from Wilton that is a liquid gel. This is because your liquid food colors you get from the market make your egg whites too liquidy and tend to brown in the oven. No one wants a perfectly pink macaroon with brown edges…Also, note, that when you add color to the macarons, go a couple of shades darker than you want. That’s because when the egg white foam up and when the cookies bake, they tend to lose a little bit of color.
4. Now it’s time to whip your egg whites. I like to start low and make sure the coloring gets mixed up (and doesn’t fly out of your bowl) before turning the speed up higher.
5. Let the egg whites whip, paying attention to the changes that occur. They should start to lighten and get creamy. Check ever so often to see if they are to the stiff peak stage…..here I am checking them…..nope, still a bit too soft.
6. Now, you can whip them too long, but if you do it shouldn’t be a huge deal, but they will make for a more brittle cookie.
7. So now we incorporate the almond meal/sugar mixture into the egg white mixture. This is another critical part of making macarons. We want the eggs and the almonds to come together, but we don’t want all that beautiful air that we just whipped in to escape, so instead of stirring, we need to gently fold the almond mixture into egg whites. I like to hold the bowl kind of on its side and just scrape the sides and then fold the batter on top. So, like I said, this process is critical, and you have to really pay attention. You can fold this too much, letting out too much air, and it will be too runny. You want to keep folding the batter until it starts to smooth out just a bit, and to where it can slowly slip off the spatula….kind of like hot lava. If you don’t mix it enough, the shells will crack, but if you over mix it, then it becomes too runny for the cookies to set up.
8. Fit a pastry bag with a larger circular tip. I like to twist the end a bit to keep the batter from running out while I’m filling the bag. I also like to place the pastry bag in a cup to help keep it open while I fill.
9. To pipe the macarons shells, hold the bag straight up, and gently squeeze until the batter fills almost the whole template circle. Then, slowly release up and out. This might take a bit of practice, but it gets easier. Don’t worry about them being perfect, they will settle a bit. Also, once you sandwich the shells together, you won’t notice any slight imperfections.
10. Another critical step is whacking the trays on the counter. This does two things…..1. It helps to release any air bubbles that might be trapped in your cookies, and 2. It helps even out the cookies a bit. The first time I did this, I was scared it would hurt the cookies, but now, it’s my favorite part of making them.
11.Now it’s time to let your macarons rest. Let them sit for 20 to 30 minutes on your countertop until they dry out a bit and form a skin on them. You might have to touch one to see if it’s dry enough. If it’s very humid in your area, it might take longer than 30 minutes….it could even take up to an hour. Waiting at this point may be hard, but it’s a critical step. That’s because the skin keeps the cookies from spreading during the baking process. You want your macarons to puff up, not spread out.
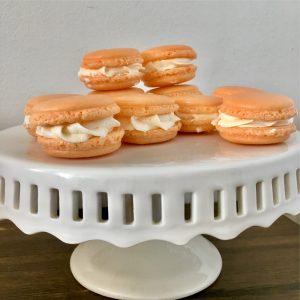
12. Bake at 300 degrees for about 13 minutes. When you remove them from the oven, let them cool before peeling them off your silicone mat or parchment paper. Hot macarons are fragile, but they should be easy to remove once cooled. Notice the trademark puffy edges of these macarons? These are called feet, and this is exactly what you want.
13. Now it’s time for my other favorite part….marrying your macarons. Pair them up, matching them by size and shape. Then, fill a pastry bag with your favorite filling. This one’s a homemade buttercream. Swirl it on one side of the macaron and gently sandwich the pair together.
And there you have it the lazy girl’s guide to the perfect little French Macarons….
Give it a try. They always impress at parties and dinners, and they also make a great gift. These babies are headed to some sweet friends who helped throw me a birthday party.
Ingredients:
1 2/3 cups of powdered sugar
1 cup of almond meal
1/4 cup of sugar
3 egg whites
gel food coloring
Note, I have not tried this conversion recipe. I looked up the conversion of the grams to cups in dry goods.
Storing Macarons:
Macarons can store pretty well — usually about a week in the fridge in an air-tight-container. Many people like to wait to the macarons have set for a day or two — so that the flavors can mix well together. This is called “aging” or “ripening.”
Freezing and Thawing:
You can freeze both macaron shells and filled macarons. They should keep for up to six months in the freezer. For the shells, layer them between sheets of parchment paper in an air-tight container. You can also free filled macarons this way. To unthaw, make sure to set them out of the freezer several hours before serving. Frozen macaron shells are crisper and will crack instead of being the traditional chewy consistency.
What if I don’t have almond meal? Can I still make them?
If you don’t have almond meal, you can make your own using blanched almonds. (Blanched means they have been briefly placed in hot/boiling water to remove the skins. If you use regular almonds with skins, you will have brown bits in the macarons and they won’t be smooth.) Place the blanched almonds in a food process and pulse a couple of times till smooth. If you over pulse or mix too long, it will turn into almond butter! You may want to sift the almond flour to remove bigger chunks.
It is called “Spring in My Step” and can be downloaded to use in your YouTube videos for free. Enjoy!
Pictures from our Readers & Viewers
This picture was sent to us from YouTube viewer Melinda aka the Cake Pop Mafia from Pinterest. Did she do a fabulous job?! Go over and check out her Pinterest board and see all the fun things she’s creating in her kitchen. You won’t be sorry!